Dealing With iPhone Speaker Issues: Sand Removal Guide
Read Time:11 Minute, 13 Second
Imagine you’re about to listen to your favorite tune or take an important call, but as you turn up your iPhone, the sound is muffled, almost as if it’s battling to break free. Frustration builds as you realize your speaker is clogged with sand—a common plight for many, especially after beach outings or accidental exposure to sandy environments. It’s not just about compromised audio quality; this tiny issue can escalate, affecting your phone’s overall functionality.
To remove sand from your iPhone speaker, gently brush away the debris with a soft-bristled brush. Avoid pushing the sand further into the device. For stubborn particles, lightly use adhesive tape to pull out the sand. Always be gentle to prevent damage.
But fear not, for there is a straightforward solution to this gritty problem. Careful steps can help restore your iPhone’s speaker to its clear, crisp sound without costly repairs.
Understanding How Sand Affects Your iPhone Speaker
Understanding how sand affects your iPhone speaker is crucial, especially if you often find yourself in sandy environments like beaches or deserts. Due to its fine and gritty nature, sand can easily get lodged in the tiny openings of your iPhone’s speaker grille. This intrusion doesn’t just stop at a superficial level; it can penetrate deeper into the speaker mechanism.
When sand particles enter the speaker grille, they can disrupt the delicate balance of the speaker’s internal components. The primary impact is on the audio output – your music, call audio, or any other sound can become muffled or distorted. This happens because sand particles interfere with the vibration of the speaker’s diaphragm, which is essential for producing sound. In simpler terms, the speaker’s ability to move freely and create sound waves is compromised, leading to poor audio quality.
But the problems can escalate beyond just audio quality. If sand remains lodged inside for an extended period, it can lead to more serious, potentially permanent damage. The abrasive nature of sand can wear down the delicate components inside the speaker, causing irreparable harm. Moreover, if sand particles make their way into other parts of the phone, they can also cause issues with different functionalities.
The risk isn’t limited to dropping your phone in the sand. Even keeping it in a sandy bag or pocket can be enough for these tiny particles to find their way into your speaker grille. Prevention, therefore, is key. Protective cases with covers for ports and speakers can significantly reduce the risk of sand intrusion. But in cases where prevention fails, knowing how to effectively and safely remove the sand becomes crucial to preserving your iPhone’s functionality and longevity.
Method 1: Using Compressed Air For Sand Removal
Using compressed air is an effective method to remove sand from your iPhone’s speakers. However, using this method carefully is crucial to avoid damaging the delicate internal components. Here’s a step-by-step guide on how to do it safely:
- Choose The Right Compressed Air: Opt for a can of compressed air designed for electronics. These cans come with a nozzle that allows for controlled airflow.
- Power Off Your iPhone: Before you start, turn off your iPhone. This is a safety precaution to prevent any damage to the electronic components.
- Hold The Can Correctly: Keep the can upright to avoid any liquid fuel from escaping. Tilting or shaking the can might cause liquid to spray out, which can damage your iPhone.
- Position The Nozzle: Hold the nozzle a few inches from the speaker grille. Do not insert the nozzle directly into the grille; this could push the sand deeper into the speaker.
- Use Short Bursts Of Air: Gently apply short bursts of air across the speaker grille. This should loosen and remove the sand particles. Be careful not to use long, continuous bursts, as this could be too forceful.
- Inspect And Repeat If Necessary: After applying the air, check if there are still visible sand particles. If so, repeat the process gently until the sand is removed.
- Let Your iPhone Rest: After cleaning, give your iPhone time to rest before turning it back on. This ensures that if any accidental moisture gets in, it has time to evaporate.
Remember, while compressed air is effective, it must be used cautiously. Excessive force can damage the speaker components. If the sand is deeply lodged or you need clarification on doing it yourself, consider seeking professional assistance.
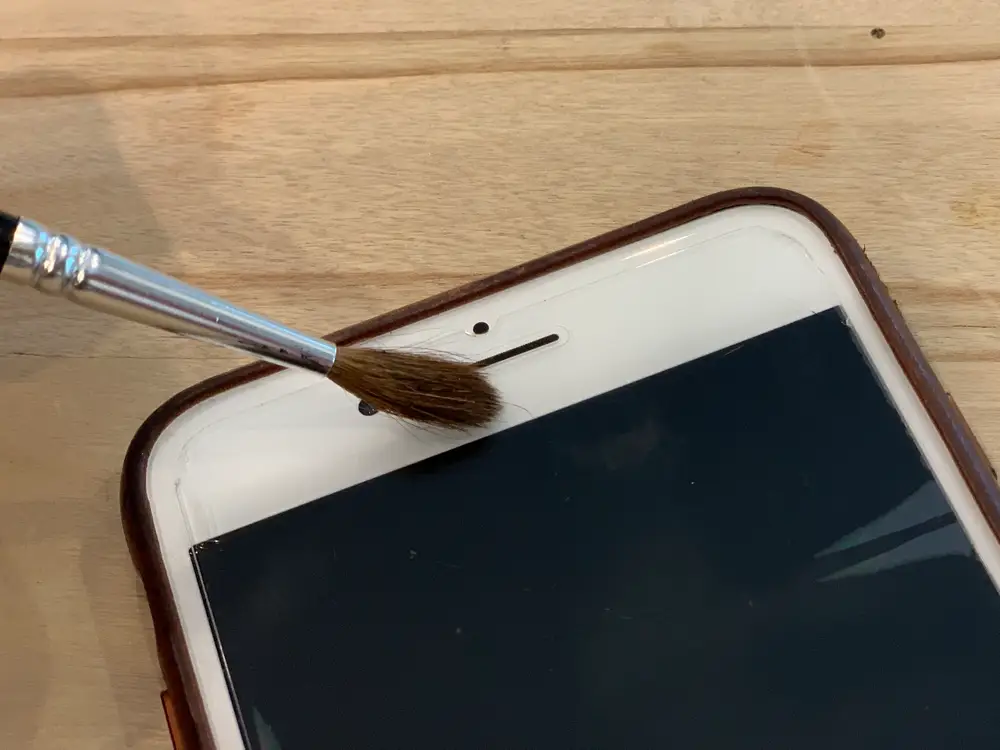
Method 2: Using A Soft Brush Or Toothbrush
A soft-bristled brush or toothbrush is another safe and effective method for removing sand from your iPhone speaker. This method is particularly useful for dislodging particles stuck in the grille without risking internal damage. Here’s how to do it:
- Select The Right Brush: Choose a brush with soft bristles – a toothbrush or a small paintbrush works well. Ensure the brush is dry to avoid introducing any moisture into your device.
- Power Off Your iPhone: Always start by turning off your iPhone. This reduces the risk of damage to the electronic components during cleaning.
- Gently Brush The Speaker Grille: Hold your iPhone with the speaker grille facing upwards. Gently brush over the grille in a circular motion. The idea is to loosen the sand particles without pushing them deeper into the speaker. Be gentle to avoid damaging the grille.
- Change Angles: Tilt the iPhone at different angles while brushing. This helps dislodge the sand particles more effectively and lets them fall out.
- Tap The Phone: After brushing, lightly tap the edge of your phone against your hand. This can help remove any loosened sand particles from the grille.
- Inspect And Repeat: Check the speaker grille to see if sand remains. Repeat the brushing and tapping process until all visible sand is removed.
- Avoid Using Moisture: Do not use any liquids or damp brushes, as moisture can damage the internal components of your iPhone.
This method is particularly useful for those who prefer a more hands-on approach and cannot access compressed air. The soft bristles are gentle on your device, making this a safe option for regular maintenance to keep your speaker clean and functioning optimally.
For more comprehensive guides on maintaining your electronic devices and troubleshooting common issues, check AMtricks for more helpful tips and tricks.
Method 3: Using A Vacuum Cleaner
A vacuum’s suction power can draw out particles from nooks and crannies that brushes might miss. Here’s how to use this method effectively:
- Select A Suitable Vacuum Cleaner: Choose a vacuum with adjustable suction power and ensure it has a soft brush attachment. A handheld vacuum is ideal due to its size and maneuverability.
- Attach The Soft Brush: Fit the soft brush attachment to the vacuum. This attachment is gentle on the phone’s surface and prevents any scratching.
- Power Off Your iPhone: Turn off your iPhone before cleaning as a safety measure.
- Gentle Application: Hold the vacuum cleaner’s brush attachment close to the speaker grille, but do not press it directly against the phone. The goal is to use the suction to draw out the sand particles, not to push them deeper.
- Adjust Suction Power: Use the lowest suction setting to start. If needed, you can gradually increase it, but high suction power might damage the internal components.
- Move Slowly And Carefully: Move the brush attachment over the speaker area. Be cautious not to touch the screen or other sensitive phone parts.
- Inspect And Repeat: Check the speaker grille for remaining sand after vacuuming. Repeat the process if necessary, but always maintain a gentle approach.
- Avoid Excessive Suction: Be mindful not to use excessive suction, especially near the microphone and other openings, as it might pull out small, essential components of the phone.
A vacuum cleaner is particularly useful when dealing with significant sand. It’s a method that complements brushing or compressed air, especially if they don’t fully clear the sand. However, if you’re unsure or uncomfortable using a vacuum cleaner on your phone, seek professional assistance.
Method 4: Rice Or Silica Gel Method For Stubborn Sand Particles
The rice and silica gel methods are alternative solutions for removing stubborn sand particles and residual moisture from your iPhone’s speakers. While primarily known for their moisture-absorbing properties, these methods can also help dislodge and absorb fine sand particles.
Here’s how to use them with rice method:
- Gather Materials: You’ll need a sealable bag and enough uncooked rice to cover your iPhone completely.
- Power Off Your iPhone: Turn off your device to avoid electrical issues.
- Immerse In Rice: Place your iPhone in the bag and cover it with rice. The rice acts as a desiccant, drawing out moisture and potentially helping to loosen and absorb fine sand particles.
- Leave It For 24-48 Hours: Let your phone sit in the rice for preferably 48 hours. The longer it stays, the more effective it might be in drawing out sand and moisture.
- Remove And Clean: Remove your phone and any rice dust or residues after waiting. Use a soft brush and brush away any particles from the speaker grille.
Here’s how to use them with Silica Gel method:
- Collect Silica Gel Packets: These are often found in new shoe boxes, bags, or electronic packages.
- Prepare The Container: Turn off your iPhone and place it in a sealable bag or container like the rice method.
- Add Silica Gel Packets: Place several silica gel packets around the iPhone. These packets absorb moisture more effectively than rice and can help dislodge fine sand particles.
- Seal And Wait: Seal the bag or container and leave your phone inside for at least 24 hours.
- Remove And Inspect: Take out your phone and inspect the speaker grille. Gently remove any loosened sand particles.
While both methods are popular for dealing with moisture, their effectiveness in removing sand has yet to be scientifically proven. They are considered a safe and non-invasive first step in dislodging and removing sand particles. However, if the sand is deeply embedded or these methods don’t work, professional cleaning may be necessary.
Prevention Tips And Maintenance
Preventing sand from getting into your iPhone’s speaker and maintaining the device to avoid similar issues involves a few proactive steps:
- Use Protective Cases: Invest in a good quality case that covers your iPhone’s ports and speakers. Some cases are designed for outdoor or beach use, offering extra protection against sand and dust.
- Avoid Sandy Environments: Keep your iPhone in a sealed bag or container when in sandy areas, such as beaches or deserts. If you need to use it, be cautious and avoid direct contact with sand.
- Keep It In Safe Places: Be mindful of where you place your phone. Avoid putting it directly on sandy surfaces. Pockets, bags, or other places where sand can accumulate should also be avoided.
- Be Cautious During Activities: If you’re engaging in activities like hiking, beach volleyball, or camping, it’s wise to keep your iPhone in a protective pouch or leave it somewhere safe.
- Use Screen Protectors: A screen protector can also help as some designs offer a slight overhang over the speaker, providing an additional barrier against sand.
Combined with regular maintenance, these preventive measures can significantly reduce the risk of sand getting into your iPhone’s speaker and maintain overall health and functionality.
FAQs
Why is there sand in my phone speaker?
Sand can get into your phone speaker when exposed to sandy environments like beaches or deserts or if you drop your phone in the sand. It’s also common for sand to transfer from pockets to the speaker.
What are the potential risks of having sand in my phone speaker?
Sand in the speaker can affect sound quality, leading to muffled or distorted audio. It can permanently damage the speaker, causing a loss of functionality.
Can I remove sand from my phone speaker myself?
Yes, you can attempt to remove sand yourself. Methods include using compressed air, a soft brush, or gentle tapping to dislodge the sand particles. Be cautious to avoid causing further damage.
How do I use compressed air to remove sand from my phone speaker?
Use a nozzle attachment on the compressed air can. Hold the phone with the speaker side down and gently blow air into the grille. This can help dislodge the sand particles.
What should I do if the sand doesn’t come out with compressed air?
If compressed air doesn’t work, gently use a soft brush like a toothbrush or paintbrush to remove the remaining particles. Be careful not to exert too much pressure to avoid damaging the speaker.
Conclusion
In summary, removing sand from your iPhone’s speaker can be tackled with several DIY methods: using compressed air for gentle removal, a soft-bristled brush or toothbrush for careful brushing, a vacuum cleaner with a soft brush attachment for suctioning, and the rice or silica gel methods for absorbing stubborn particles.
While these approaches are effective for minor issues, more is needed for severe cases. If you’ve tried these methods and still face issues with your speaker, or if the problem seems extreme (like deep sand intrusion or noticeable damage), it’s advisable to seek professional help. Expert technicians have the right tools and expertise to safely and effectively resolve intricate problems without risking further damage to your device. Remember, timely professional intervention can be crucial in preserving the functionality and longevity of your iPhone.
“Discover easy and effective methods to remove sand from your iPhone speaker. Keep your sound crisp and clear with our step-by-step guide. Click to learn more!”
Happy
0 %
Sad
0 %
Excited
0 %
Sleepy
0 %
Angry
0 %
Surprise
100 %
More Stories

How AISong Turns a Song Into a New Vocal Cover
For content creators, producing a fresh vocal version of a song can require a singer, recording space, editing time, and...

What Size LED Screen Do I Need for a Trade Show Booth?
A trade show booth can look roomy on a floor plan and feel crowded the moment crates, counters, staff, lighting,...

The AI Image Editor That Finally Makes Sense of the Model Explosion
If you have spent any time with AI image generation over the past year, you have likely accumulated a mental...

Load Testing as a Service: Why Engineering Teams Are Ditching Agency Wait Times for Self-Serve Platforms
Your release is scheduled. Your load test isn't. If you've outsourced performance testing before, you know the pattern: you request...

When to Upgrade Your Business Data Storage System
Data never stops piling up. Customer records, financial files, project docs, operational logs — they accumulate fast, often faster than...

AI Image Maker: Turn Text Prompts into Ready‑to‑Use Visuals
Creating original visuals for every campaign or project can quickly become a bottleneck when you rely on traditional design workflows....